Tuesday, February 2, 2016

A Much Needed Update...

Since my last post, we’ve had a whirlwind of changes! In August, Chad moved to the Seattle area to continue looking for work. In October, our house sold and the kids and I joined Chad.

Moving Day from our old house "Dexter Heights" this last October.
Since then, we’ve  lived with my gracious parents in my seaside hometown just outside of Seattle. We’ve enjoyed staying at “Gramma & Guppy’s House” over the holidays.

Our temporary home near Seattle - my parents' house (that my dad built!)
Right after the new year, Chad had - not one - but several job offers to consider! Praise the Lord! We are excited to announce that Chad accepted a job with a local Rescue Mission in Tacoma on their Development Team, using his 11 years of experience raising funds for ministry. Thankfully, this is a fully-funded position with benefits. So our years of raising personal support are done. We are incredibly thankful to God for providing a job in an established ministry that is such a good fit for Chad and matches our hearts for the poor and marginalized.

Our future home near Tacoma - moving in this month

Now we are in the process of buying a home (already remodeled! What will we do with all our spare time?), in a quaint little town near Tacoma, with great schools, quiet neighborhoods, and close to the water, beach, parks and trails. We are so grateful and humbled by God’s good gifts in not only answering our prayers for a job and a home, but giving us the desires of our heart in this particular job and in the area we used to call home! God is so good.

Wednesday, August 5, 2015

House Tour {Part 1} - Before and After

After 5 years in Pullman doing collegiate ministry, we are moving back home to the greater Seattle -Tacoma area. We had a blast here in "Cougar Country" but we feel God's leading away from here and toward there. We are excited to move back home near both sides of our family and to both use our gifts in new jobs too. We aren't sure where we will settle, hopefully close to the jobs we find (in business and ministry), our families, the water, maybe a lake or two for swimming, and close to a little more shopping. (Oh the things we missed while living in Eastern Washington!)

But for now, we are focused on selling our current home. I lovingly refer to it as "Pioneer Heights" since it is perched on Pioneer Hill, near parks, downtown, and in one of the best and oldest neighborhoods in Pullman - what a sweet location. For the past few months, our noses have been to the grindstone finishing up our basement remodel and shaping up the rest of the house. And now we are officially on the market! So, without further ado, here is the first set of Before and After pictures of Pioneer Heights - our home for the last 3 years:

Living Room - Before & After
Before we moved in - dark knotty pine & navy wall, dated fireplace & no overhead lighting.

After - We painted, decorated, changed the fireplace, window treatments & lighting. Here's the final "staged" product. 

Before - window valances and curtains did no favors to those lovely windows.

After - the windows (from another perspective) with new double curtains hung high & wide - to show them off.

Before - Orangish knotty pine & old brick fireplace darkened the room.
After - I painted the pine a light taupe to match the other walls, crisp white went on the mantle, trim & built ins, and the fireplace brick was painted black to add some much needed contrast.
After - The whole living room feels lighter, larger and updated with the new fresh paint on the walls, trim and fireplace.


Dining Room - Before & After

Before - The small lovely dining room was not serving its purpose.
After - Layered drapes highlight the beautiful windows. A refinished glossy ebony round table (w/leaves) offers flexible seating & fits the room well. New lighting centers the room and gives it an updated, polished look.

The Kitchen - Before & After

Before - Orangish-red countertops & backsplash, and cabinets that blocked the eating area and view of the yard beyond.

After - I replaced the laminate with cement countertops (I used a product called "Ardex") & crisp white subway tile with dark grout for the backsplash. We took down the upper cabinets & I replaced them with new pendant lights over the bar and the remaining beam got clad in weathered shiplap (I reclaimed it as is from our laundry room). New stainless steel appliances complete the updated look.

After - Here's the other side of the bar (in the kitchen nook). I added the barn wood to the bar (extra fencing we had on hand) which makes a great pin board for the kids' artwork (keeping the fridge uncluttered). I added the open shelves and tied everything together with some old corbels I scored at my favorite reclamation junk yard. Four stools painted light blue completed the look.
 Kitchen Nook - Before & After

Before - this is how the nook was furnished before we moved in. Its such a large room, it can be utilized better - more seating, more storage, and let's play up the great view of our large backyard.
After - Built in cabinets (IKEA) and a window bench (my dad & I custom built) provide ample storage and frame the view of the backyard nicely. The table can expand to seat 12, with the window bench providing a lot of comfy seating.

Backyard - Before & After
Before - from the Kitchen Nook, the paned-glass sliding door leads out to a large deck. The deck wide steps along part of it but no railing along the rest of that side - just a 2-3 foot drop into the garden and yard!
We added more railing and bench around the deck and painted it white for a fresher look. We also refinished the deck.
Here's more pictures of our big backyard:
View from the deck - garage on the left, shed in the back right corner. The 3 trees provide wonderful shade in the afternoons.


View from the back yard - up to the house and large deck. This place is great for entertaining!

The shed offers great storage for all our yard stuff and outdoor toys.

View from the back gate coming from the driveway into the backyard.

That completes Part 1 of the "Pioneer Heights" house tour! Stay tuned for a tour of the 4 bedrooms, 2 bathrooms and the newly remodeled downstairs!

Thursday, April 2, 2015

Last Minute Easter Ideas - Three Easter Themes

Looking for some inspiration for Easter centerpieces and decor? Here are some images of three different Easters we hosted in our home. The theme colors were: Yellow & Green, Blue & Brown, Pink and Rustic. Hope this helps!

A Yellow and Green Easter
Some of the easter decor from around the house.

Mini Daffodils from the store, covered in mounds of moss.

I mounded various kinds of found moss on silver platters.

I dyed eggs & while they were still wet, rolled them in coffee grounds for a more natural look.
Let the eggs dry, then brush off the grounds. Repeat as necessary for desired look.

Yellow and Green eggs nestled into the moss, made a fun centerpiece.
Add mini Daffodils for a complete Easter vignette!
A Blue & Brown Easter

The moss on silver platters are back! This time with robin's egg blue shells broken on the top and filled with water and little blue & white flowers. Other various blue eggs are nestled in, including chocolate eggs.

Pull out any matching china you have. Here is some on tray at our coffee station.

The buffet had a centerpiece of brown and blue eggs and candles wrapped in blue ribbon & twine.

I used white and brown eggs and blew-out the insides before dying.

The dessert table and fun blue polka-dot napkins.

Another glimpse of the centerpieces. Notice the blue egg on the table in the upper left corner?
Those were real egg shells that I dyed and filled with chocolate and ganache. 
(Find the recipe here. Thank you Martha Stewart!)
They made fun deserts for everyone to un-peel like a real egg!
A Pink and Rustic Easter

For this Easter, I Modge Podged old book pages onto plastic eggs & mixed in with white and pink dyed eggs.

Here they are on my kitchen shelf.

Kitchen shelves decorated for easter with old Fiestware and silver.


The centerpieces were pink, white & book page eggs hanging from branches. (I hot glued little loops of twine on each egg.)

Here is the centerpiece in the Dining Room. I used some antique pink & white linens I had under each centerpiece.

Dessert plates stacked in the corner wait for their debut.

Stacks of china for the adults and less precious plates for the little ones.

Save on dishwashing! Use paper cups to make beverages easy - you can use for hot or cold drinks and
write your name on them. Use plastic silverware rolled up in napkins & tied with twine to make the buffet line quick too.

Plenty of outdoor seating as weather permits - overlooking a fun game of croquet in the back yard.
Tables are dressed up with white linens and topped with pots of pink primroses.

Kids table topped with white butcher paper, playdoh & coloring crayons.
Hope this gives you some fun ideas to try out. Happy Easter! And don't forget the TRUE REASON we celebrate this Easter. Christ rose from the dead, conquering death so that we may have life.

He is risen indeed!

Friday, March 6, 2015

Lessons from A to Z ~ Demo Day

The kids took the first swings of the sledgehammer.
Our basement remodel is now in full swing. And in the days leading up to it, the kids were so excited for "Demo Day". The day when construction officially begins with demolishing - building up, by tearing down. They couldn't wait to swing a sledgehammer, put holes in walls and tear things down - turning the hopes of a new basement and bedroom into a reality.

I however always enter this day of a remodel with mixed feelings. I too am excited for new construction and the beginning of new and better things. But with a demolition, things always look worse before they look better. Demo is messy, dirty, dramatic, sometimes dangerous and even injurious. And afterward there is no going back to exactly what it was before.

There is the underlying fear that it will stay in this state. Many a house has been deserted after it's demolition, when the cost seemed too great a price to pay. Others are rebuilt using shortcuts, with  problems left hidden behind the walls. Less valuable and left incomplete. BUT even the most valuable, highest quality improvements cannot be done without this crucial step. A house cannot be improved on without some deconstruction. And therein lies my HOPE.

We all have areas in our life that need deconstruction - it is called sin. We are ALL in need of a remodel. Starting with some demolition. Maybe we need a sledgehammer, maybe we need smaller tools to carefully deconstruct. But either way, we need to allow The Carpenter to remodel us. It is our one hope. 

So like my kids, let's get excited. Let's get messy. Let's power through the necessary demo, and continue working toward the hope of Christ remodeling us.

Let Demo Day begin.

Behold I make all things new. ~ Revelation 21:5

The bricks have fallen, but we will build with dressed stones; 
the sycamores have been cut down, 
but we will put cedars in their place. ~ Isaiah 9:10

You yourselves like living stones are being built up as a spiritual house, 
to be a holy priesthood, 
to offer spiritual sacrifices acceptable to God through Jesus Christ.  ~ 1 Peter 2:5

Friday, January 16, 2015

Two Lego Birthdays

Another birthday party post!

In January, we have two birthdays to celebrate in our family: our youngest son's on the 3rd...


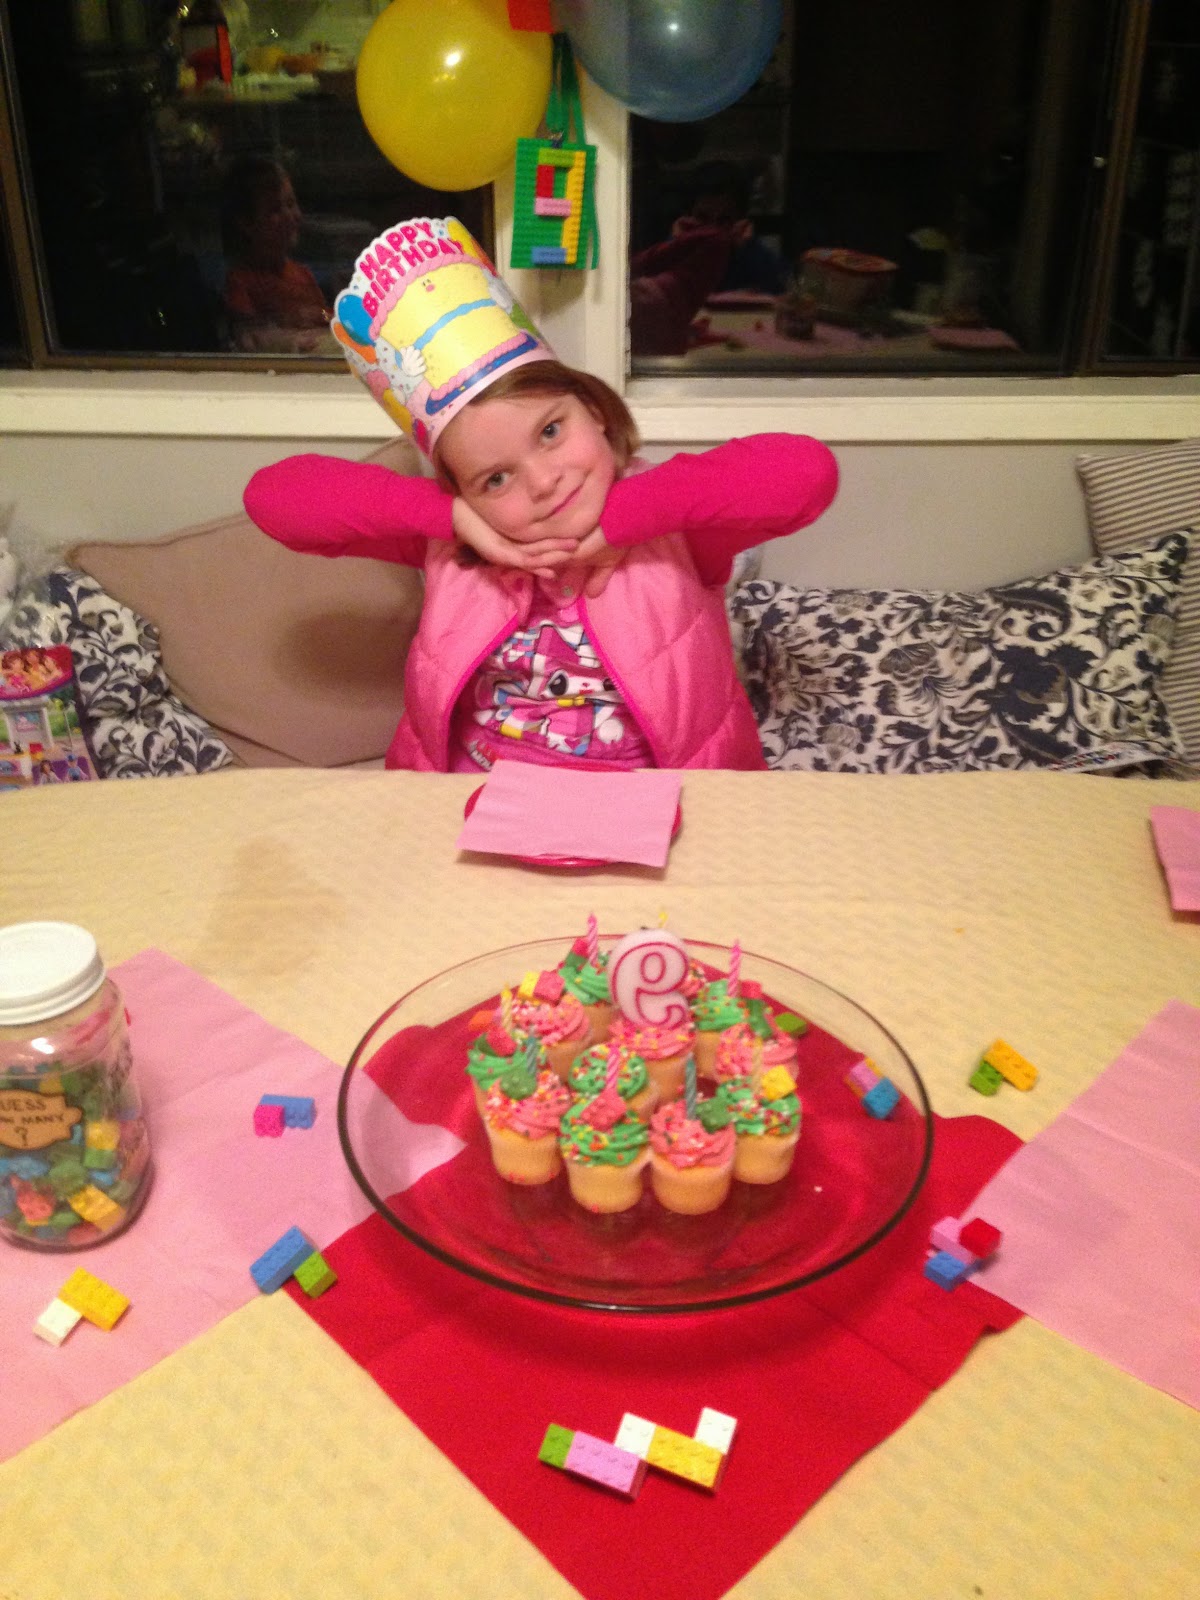
and our youngest daughter's on the 6th...


As much as I love celebrating our kids' lives, I am a bit party-weary after the holidays. So to make it easier, I try to find themes that work for both him AND her so I can use the same decor for both. Some years they share a party too. This year was all about the LEGOs!

{A BOY LEGO PARTY}


To keep things easy, I got store-bought mini cupcakes. BUT I dressed them up for our Lego Theme by topping them with candies shaped as Legos. So cute! I got them for a great deal in Winco's bulk aisle.


The kids made a Lego cup to hold the spoons for ice cream. I used our brightly colored fiestaware, and primary colored cups, napkins & decor.


I used their own legos to decorate with around the table - boy colors for my son and then I added pink a few days later for my daughter. We also had a jar of candy legos to guess how many pieces were in there. My oldest daughter made and decorated the cards for the game.


Blowing out 4 candles... while wearing a party hat made by one of his sisters.


 {A GIRL LEGO PARTY}

 I kept the boy decor up, and added some pink balloons to it.

 
I switched the "4" Lego sign hanging from the balloons, to read "9".


 I hung pretty homemade pennant banners/bunting and a birthday sign in sweet girly colors.

 
Pink and green frosting on the cupcakes, topped with more Lego-shaped candies.

 
All for our sweet 9 year old daughter!


 This was such a fun and easy party, using things we already had - brightly colored legos, dishes, napkins & balloons and a few store-bought cupcakes & candy. Lego was such a great theme!