Friday, January 16, 2015

Two Lego Birthdays

Another birthday party post!

In January, we have two birthdays to celebrate in our family: our youngest son's on the 3rd...


and our youngest daughter's on the 6th...


As much as I love celebrating our kids' lives, I am a bit party-weary after the holidays. So to make it easier, I try to find themes that work for both him AND her so I can use the same decor for both. Some years they share a party too. This year was all about the LEGOs!

{A BOY LEGO PARTY}


To keep things easy, I got store-bought mini cupcakes. BUT I dressed them up for our Lego Theme by topping them with candies shaped as Legos. So cute! I got them for a great deal in Winco's bulk aisle.


The kids made a Lego cup to hold the spoons for ice cream. I used our brightly colored fiestaware, and primary colored cups, napkins & decor.


I used their own legos to decorate with around the table - boy colors for my son and then I added pink a few days later for my daughter. We also had a jar of candy legos to guess how many pieces were in there. My oldest daughter made and decorated the cards for the game.


Blowing out 4 candles... while wearing a party hat made by one of his sisters.


 {A GIRL LEGO PARTY}

 I kept the boy decor up, and added some pink balloons to it.

 
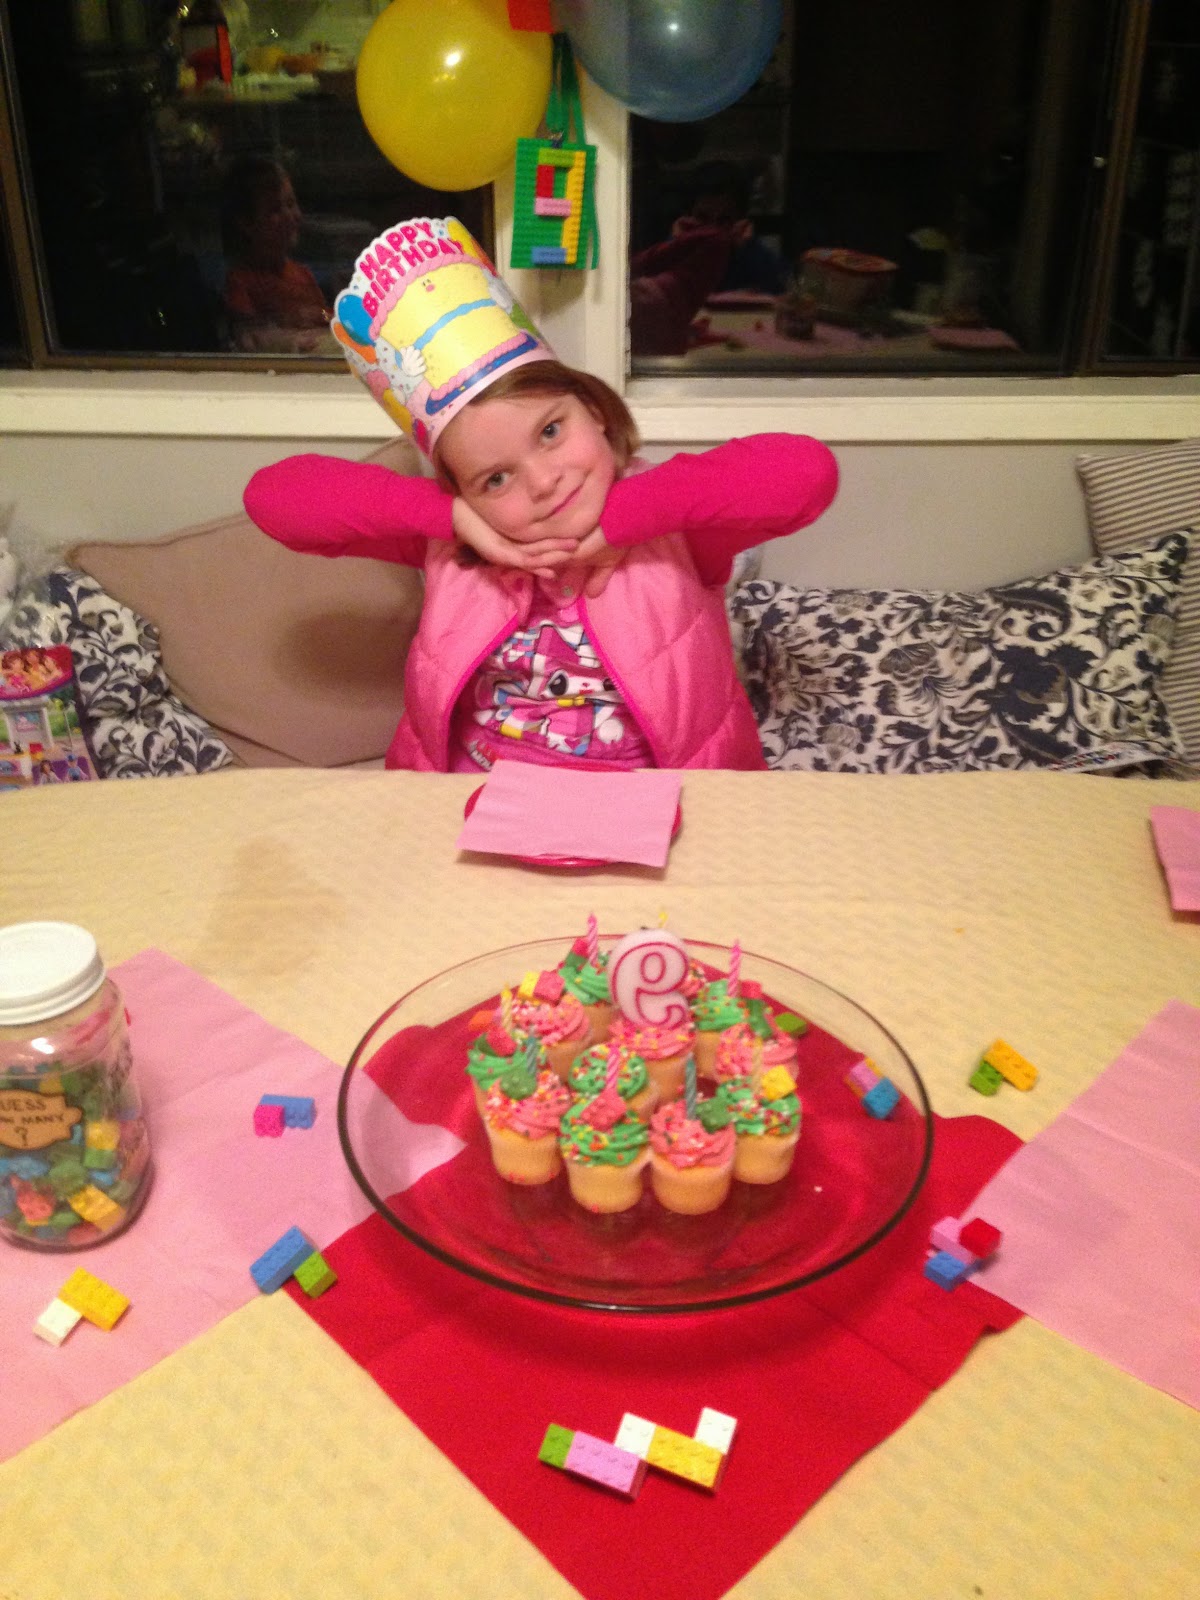
I switched the "4" Lego sign hanging from the balloons, to read "9".


 I hung pretty homemade pennant banners/bunting and a birthday sign in sweet girly colors.

 
Pink and green frosting on the cupcakes, topped with more Lego-shaped candies.

 
All for our sweet 9 year old daughter!


 This was such a fun and easy party, using things we already had - brightly colored legos, dishes, napkins & balloons and a few store-bought cupcakes & candy. Lego was such a great theme!

Wednesday, January 14, 2015

A "Frozen" Birthday Party

This year we combined our two daughters birthday parties in to one big party. A Disney "Frozen" theme was perfect for the occasion, since the party took place in the winter AND we were celebrating two sisters. 

{THE COSTUMES}
Ironically the sisters in Frozen have very similar personalities to our two girls. So they dressed up accordingly. Our oldest, responsible, protective daughter dressed as Elsa. We found an unrelated "Dragon Princess" costume at Walmart on sale after Halloween for 90% off! For just a few dollars (and some white tulle around the waist do cover up a dragon) we had a great Elsa costume!


 ... and our youngest, spunky, funny daughter dressed as Anna. She had a Christmas dress that looked a lot like Anna's coronation dress from the movie. To make it a little more special, we swept her hair back and added pretty green ribbon - just like the princess!


{FROZEN/ELSA DECOR}
We decorated the mantel with their Frozen dolls, icy blue and white balloons and some of my wintery Christmas mantel decor. I made several of the large 3-D snowflakes (like the one on the mirror here) and hung them from the ceiling at different heights. You can find a good tutorial for making these large snowflakes here.


I made a Frozen Chandelier out of white tissue "poofs", balloons, snowflake ribbon (I already had) and a big Dollar Store snow flake.


 Here's a different shot of the "icy" chandelier...


{THE FOOD}
The table was filled with lots of Frozen treats: snowflake cupcakes, "icicles" (pretzels dipped in white chocolate with blue sprinkles) and Olaf cheese sticks.


I used as much crystal and silver as possible, including these matching mint julep cups, lined with parchment paper cut into snow flakes. I used a piece of light blue fabric I had for the runner and various Dollar Store snow flakes on the table top.


My oldest blew out candles on her snowflake cupcakes.


While my youngest daughter blew out candles on "Arendelle" inspired cupcakes. (There's a good shot of her Princess Anna hairdo!)


{ARENDELLE/ANNA DECOR}
I also decorated our kitchen eating nook in the Frozen kingdom of Arendelle's colors: green purple and pink. I bought an official Frozen table cloth for a few dollars and then matched the balloons, crepe paper & tissue paper poof to its colors.


Although I didn't use these darling banners below, I just found these and had to recommend them! If you're looking for more Frozen Arendelle decor click here for these cute banners.


{GAMES}
We played a few games, like this one below called "Do You Want To Build a Snowman?" Supplies used: toilet paper, and construction paper cut into coal buttons and a carrot nose.


The girls' party guests split into 2 teams and had to make the birthday girls look like snowmen by the end of the song by the same name.


So cute! We also played "Pin the Nose on Olaf" (thank you Pinterest!). The girls were blindfolded, spun around a few times and then tried to pin paper carrot noses on an Olaf. Whoever was closest won a Frozen Play Pack with crayons, stickers and a little coloring book.


The Olaf cut out was made from poster board, outlined in sharpie & craft paper for the arms, coal buttons and each girl's carrot nose. 


We also played "Scoop the Snowballs", a common cotton ball game played at showers. (Each player takes turns getting blind folded and has 30 second to scoop as many cotton balls from one bowl to another, using a large mixing spoon.) Then it was present time!


One last touch: our Frozen themed tree! Since this party was in early December, I partially decorated our tree - using only our snowflakes, icicles and other snowy white & silver ornaments we had. I topped the tree off with another Dollar Store large snowflake. It was a fun and easy touch for our wintery Frozen backdrop. After the party was over, I finished decorating our tree for Christmas.


We had such fun at this party and didn't spend much at all for a wonderful time! Hope this helps inspire your next Frozen Party!

Monday, January 12, 2015

Lessons from A to Z ~ Quieres Jugar?


This Thanksgiving we took Abby & Zoe on their first International Mission trip to Tijuana Mexico, through our church Resonate


Our team of 27, made up of mostly college students and 2 families, partnered with Centro Shalom Church, staying in their compound at night and venturing into the barrios during the day.


Our team (and our family!) split up, using our gifts to do different tasks: I lead one of our house builds. 


The girls joined the VBS team in the barrio. 


And Chad led the cooking crew, splitting his extra time at VBS, the build, and speaking at the Thanksgiving Church Service. 


At first, I was a little concerned we weren’t together. But we were each so excited to be using our gifts in different ways. So the girls stepped out with the VBS team into the barrios on their own two “missionary legs”. 


Armed with a few Spanish phrases like,“Quieres jugar?” (Do you want to play?) 


And handing out “Invitations especial” (Special invitations) for VBS, the girls made fast friends.  

Minutes into meeting, they knew the children’s names and were playing a   rousing game of tag. With shacks and dirt as far as the eye could see, the girls didn’t hesitate to do what they do best—make friends and share Christ. Unhindered, unashamed, uncomplicated and totally having a blast. The girls reminded me that this is what missions is!


This is what Christ modeled for us: walking into communities, meeting people where they live, calling them by name and giving them a very “special invitation”. As a believer, the girls were such a good example for me. But as their mother, I was overwhelmed with JOY at seeing my daughters, my sisters in Christ, thriving at doing the very thing Christ has commissioned them to do.


Missions is that simple! Find someone who wants to play with you, then share with them the most special invitation ever. Quieres jugar?


“Go therefore and make disciples of all nations…” 
Matthew 28:18

Sunday, November 9, 2014

Lessons from A to Z ~ A Lesson From Hagar

Every weekday morning, I drive the kids to school. We have 4 minutes in the car together. And I use that time to pray out loud for each of them. I pray over anything specific they have for the day—a test, a project, friend issues. I pray that they will be a blessing to their teachers and peers. I thank God that He loves them so much, that He wants to use them in their school, and that He is with them through the day. And then I open the car door and send them off to their own little worlds of elementary and preschool. Worlds I am not a major part of. I don’t follow them. I can’t see or hear them. But God does.


“You are the God who sees…” ~ Genesis 16:13

I was reminded of this verse last month as I spoke on Hagar at our annual Women’s Breakfast. Her story is a powerful one and can be found in Genesis 16 and 21. In both chapters, Hagar encounters God in the middle of the desert when she is most desperate and alone. She is reminded that: God SEES you, God HEARS you, and God has a PLAN for you.

I love that. I pray this over my children so they will remember this as they enter school: that even where I can’t follow, God is with them and has a plan for them. This has been such a comfort as we work with them through heartbreaking friend drama, frustrating subjects and disciplines that seem oh so hard to master. He sees them in class, He hears them on the playground, and He has a plan for each of them. 

Like Hagar, I pray our family can all say “I have seen the One who sees me.” (Genesis 16:13) Have you seen Him in your life?

Monday, August 18, 2014

From Trash to Treasure

Lessons from A to Z


Abby and Zoe have trash detail in our house. At first, they couldn’t have cared less about the garbage, trash day, or the mundane details like what size of can we had. Until it became their chore and they had to invest time into doing a good job.  It didn’t take long before they started to care that the recycle bins were sorted properly into glass, paper and plastic.  They even looked forward to the promised day we would get the all-encompassing recycle cans in our town.


As you can imagine, the day the larger recycling can came was a day of much rejoicing for them! So much so, that we took these pictures. We could finally fit the vast quantities a family of six recycles. No more stomping down garbage or bagging up the overflow. They ran out to meet the truck, thanking the sanitation workers, and brought the can up our driveway like a found treasure. A treasure! Because that’s what it was now.  A valuable commodity for their investment of time into that chore.


Where your treasure is, there your heart will be also. 

~ Luke 12:34


This verse shows us how wise God was in building us this way. Do you ever wish you cared a little more about something, but honestly just don’t? I have. But there is hope! This verse encourages us to invest in the stuff we know is good and worthy of our concern, even if our heart isn’t in it yet. If we are faithful to place our treasures of time and money into the hurting places of this world, God is faithful to steer our hearts toward those very things. Where is your treasure?


Thursday, August 14, 2014

Geometric/Chevron Wall - Before and After

This week I have been working on Resonate Church's offices. We have a Design Team in place and I have ADORED working with these gals, all of whom are studying Design at UofI. I want to go into business with them and be BFFs with them and, and... We have dreamed up some pretty great ideas for this much larger office space. And now we are beginning to administer them. Starting with a small grimy storage room we turned into a modern, clean-lined Conference Room.

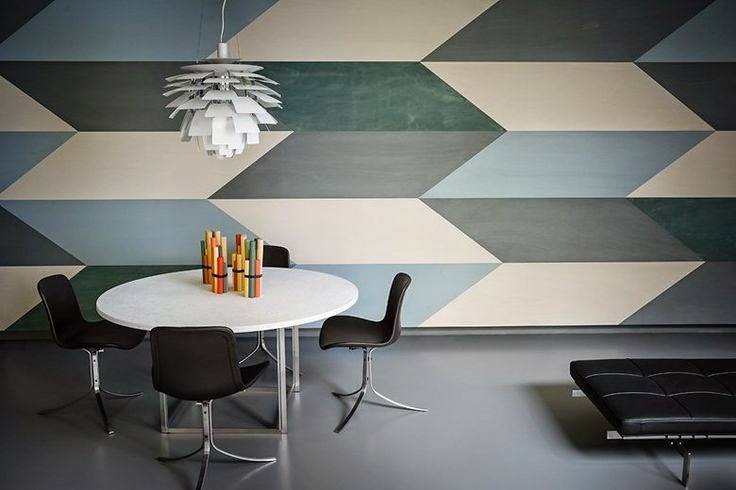
Here was our inspiration for the walls:


These images are from one of the Fritz Hansen furniture galleries. Love the chevron inspired geometric wall! It has a mid-century modern vibe too. We want all of this up in here.


This wall is actually a mosaic of different colored wooden parallelograms. But for our wall we used 5 different colors of paint and A LOT of time and tape.  

The colors were inspired by Resonate Church's logo:


Here's how we did it:

Step 1: Choose colors. We chose 2 grays, 2 greens, and 1 white that all worked well together. All Valspar paint.


Step 2: Sketch it out on paper. Doing this on a small scale will help you execute the large wall so much faster. You won't have to second guess the pattern. (Although if you're like me and accidentally paint a shape the wrong color, you may have to make another sketch!)


Step 3: Measure & mark the wall.  Using a measuring tape, level & pencil, carefully (& lightly) draw the shapes on the wall.

Step 4: Mark each piece. To save time, put a dab of each color in their respective places on the wall. This way you won't have to constantly refer back to your graph each time. (The pic below was mid-project, but you can see "dab marks" for the deeper green.)


Step 5: Tape and Paint by Number. Repeat. This takes some time! Put on some good music and tune into the perfectionist in you. Work with one color at a time, taping the outside of that color's shapes. Each color takes 2-3 coats. Remove the tape carefully. If needed, score along the tape edge with an exacto knife to keep the edges clean. Wait until each color is dry before gently taping over it for the neighboring color! This process took a few hours for an 8'6" x 8' wall. But once you get going, you can touch up paint other areas while the current color is drying.


Step 6: Touch up. With this much painting, there will inevitably be touch ups needed. The better you clean up your lines and corners, the sharper your pattern will look. (Below you can see a white gap that needed touching up.)


And here is the final result of the wall in our small 8 1/2 foot wide conference room:


We love this fresh geometric take on the chevron. So graphic!