My daughters and I recently made a Flour Sack Pillow that we worked on together. It was a wedding gift for some friends, and my daughters were their flower girls. Here is a picture I couldn't resist putting in...
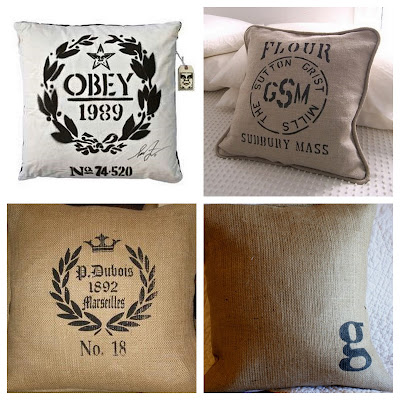
Sweet things...OK, back to doing the pillow. We first got online and searched for different designs we liked. We looked at flour sack designs, burlap, monograms. Anything that looked cool and could be personalized for the happy new couple. Here are some of our favorite inspirations:My youngest liked the flour sack idea, my oldest liked the monogrammed burlap pillow that we've done before here. So we agreed to do a two-sided pillow, one side made by each girl with their own designs. Here's our supply list:
- 1 yard of burlap
- 1 yard of flour sack material (you can buy flour sack dish towels at Walmart)
- Pillow insert
- iron-on transfer paper
- scissors, an iron, a sewing machine
Step 1. Sew pillow cover on 3-sides. I measured mine large enough for a pillow insert I had bought for the project. SIDENOTE: I actually found a cute $10 throw pillow at Ross that had a zipper-cover. I kept the pillow cover for myself (and put it around a throw pillow I already had but wasn't using). And then I basically had a high-quality, down-filled pillow insert for free for this project! And free isn't bad.
 |
| My $10 Ross pillow - keeping the cover for myself and using the insert for this project. |
 |
| Using the pillow case as a template for my pattern. |
Step 2. Create your design. After we looked online and found the styles we liked. I put together a design in Word, using the couple's wedding date, location and initials. Once each design was approved by my daughters, I inverted the images and printed it on iron-on transfer paper.
I printed the circle border (which seemed a common design on flour sacks) as two semi-circles and fit them on one sheet.
Once we printed them out, I carefully cut out the design, leaving 1/8" border of white as I cut. I didn't cut out each letter individually, but rather cut them in "groups" keeping each line of text connected. I kept a small strip in between each letter - this helped me keep them lined up and spaced evenly. I just made sure to keep it as small and subtle as possible, so the shiny finish isn't noticeable.
Step 3. Iron transfer onto pillow. I placed a small towel inside the pillow case, so the transfers wouldn't bleed through to the opposing side. Then I carefully measured and centered the design face-down on the pillow, ironed, let cool, and repeated on the other side.
 |
| Burlap side with monogrammed "D" carefully centered, ironed and cooled. |
Once completely cooled, carefully peel off the transfer's paper backing. If there are any touch-ups necessary, place the backing over the design again and iron the spots that need it.
 |
| Flour sack design - peeling the paper backing off carefully. |
Step 4. Insert pillow into case and sew remaining side. I ironed the remaining side's seam one more time to make sure I had a neat clean line to hand stitch.
Once it's sewed up, you're done! And you have yourself a one-of-a-kind pillow that looks great in any home. Here's the finished product, with my daughters showing each of their designs.
 |
| Finished Flour Sack Pillow |
 |
| Finished Burlap Monogrammed Pillow |
I liked doing the half flour sack / half burlap pillow because it matched their bridal shower's theme (burlap & white). For more details on that lovely outdoor bridal shower - click here. What a fun shower to throw and what a fun wedding gift to make with my kids!


