Saturday, August 25, 2012

Lessons from A to Z ~ Count Your Blessings


“Life is not horrible. Count your blessings.”  This is what Abby doodled on the chalk board wall at the Resonate Church office.  It is something I say often to our kids (or something like it).

It can be hard to see the blessings all around us, especially when life feels hard, or worse yet—horrible.

I will ask my sweet kids things like, “Do you have people who love you?” (Yes.) “Do you love the Lord and does He love you?” (Yes.) “Has He taken care of you so far?” (Yes.) "OK, so life isn’t horrible, it just feels that way right now.  Let's count some more blessings…"

Before long, a right perspective replaces a short-sighted pity party.  A smile returns along with a joy-filled heart.  NOW we can work on the problem, now that we have a correct perspective.

Psalm 103 gives us a great example of how to do this: “Praise the Lord, my soul; all my inmost being, praise His holy name.  Praise the Lord, my soul, and forget not all his benefits…” It goes on to list so many benefits (aka blessings) that we have when living with and for the Lord.  I encourage you to read Psalm 103 this week!

So when I get stressed or short-sighted, I stop and think of that simple message Abby wrote on the chalk board:

“Life is not horrible, count your blessings.”

“Rejoice always,
pray continually,
give thanks in all circumstances;
for this is God’s will for you in Christ Jesus.”
~ 1 Thessalonians 5:16-18

Saturday, June 30, 2012

Lessons from A to Z ~ 20/20 Hindsight


Last month we surprised Abby and Zoe with a trip to Disneyland.  As the trip   approached, we told the girls we were   flying to Seattle for a day.  But as I packed, Abby started to ask questions. “Mom, why are we packing so much?”  and “Why are we bringing swim suits?”

But once the big surprise was revealed, Abby began understanding all the strange details better.  Periodically, as we were walking thru Disneyland, Abby would blurt out, “Oh, that’s why you did that!”

I often feel the same way about God’s plans for me.  I don’t know why the strange details in my life happen, but many times I see His provisions for me in hindsight.

I have been reflecting on this especially as we are moving to a new home in a few short weeks.  As you may remember, two years ago we struggled to sell our Tacoma house and find a rental home here in Pullman.  I wanted to ask God “Why?” about a lot of things at that point.  But then He surprised us with a big beautiful house in the country - bigger than we imagined, for less than we ever thought possible.  What could have been a very temporary arrangement (staging the house while it stayed on the market), was our home for over a year and a half!  It has been a beautiful place to rest and recover after a somewhat difficult move.

And His surprises don’t end there!  He has timed this upcoming move beautifully too.  Just a month ago, Chad and I were talking about how we were looking forward to moving closer to town when the time came.  We were not only ready emotionally, but financially too:  We were just days away from buying a 2nd car, when this house sold.  Perfect timing for us to redirect our “car money” into a down payment for a house.

God is good.  All the time.  I just don’t always see it until after His plans have been revealed.

For I know the plans I have for you,” declares the LORD,
plans to prosper you and not to harm you,
plans to give you hope and a future.”   ~ Jeremiah 29:11

Monday, May 7, 2012

Lessons from A to Z ~ Letters for Our Children


Last Month Chad and I were blessed with a once-in-a-lifetime trip to the Mediterranean for a cruise with Chad’s family.  We were gone for a total of 11 days.  It was amazing, and humbling to be given such an opportunity. 

But with any major trip, the more prepared you are, the more likely you are to relax & enjoy it.  And we fully intended to enjoy this trip!  So Chad planned trip details, I prepared the home-front for our kids and their sitters. I made a notebook with house and kid info for the sitters.  We talked to our kids early on about what we were doing, what we planned for them and what we expected of them while we were gone.

Someone gave me another great idea: We made a big map of our trip, with daily letters for the kids to open, read where we were, what we were doing, and move a  little cruise ship around the map.  We added in a       personal note and a present for each of them mid-way through, to encourage them.

It was a success!  Each day, the kids excitedly read our letters, and moved the ship around the map.  When we got home, I was surprised at how much they remembered and how it helped during the time we were away.  Their example made me think about how I approach the Bible—God’s own letter to His children

As His child, do I eagerly run to His letters each day?  Do I        remember the words He has written?  Words of encouragement, instruction, even correction?  The Bible is full of personal         encouragements and information for each stage of our lives as children of God—whether babies in our faith, young and growing, or those who are more mature and helping care for others.  This is His letter to His children until His return.  I want to follow the examples of my children and eagerly run to it each day.

What words does He have for you today?

16 All Scripture is God-breathed and is useful for teaching,          rebuking, correcting and training in righteousness, 17 so that the servant of God may be thoroughly equipped for every good work.
~ 2 Timothy 3:16-17

Saturday, April 7, 2012

Lessons from A to Z ~ Putting Words In My Mouth


Putting Words In My Mouth ~ April 2012
   
In March, I had the privilege of speaking to 90 women at our Resonate Women’s Retreat.  I was the large group speaker, slotted to speak before the smaller break-out seminars.  And let me tell you, these were going to be some amazing seminars led by incredible speakers and women of God.  I knew, because I had booked the speakers myself, met with them & got the privilege of reading their notes.  I was sharpened and challenged in my walk, and was so excited for what our women were in for!

But how could I adequately prepare these ladies for the pearls of wisdom they were about to receive?  All I could think to say was, “Pay attention cause you are gonna get The Word spoken into your life and you don’t want to miss it!”

It reminded me of something I hear every week with our 3-year old foster son.  So this was the illustration I gave the women, and now I pass it on to you….

Our 3-year old has weekly speech therapy, in our effort to help him catch up verbally.  Each week, his speech therapist comes to our house with all sorts of toys, flashcards & games to play with him.  To him, it seems like any other day playing on the floor.  But she is teaching him; and when she wants him to pay attention she says enthusiastically, ”Are you ready?  OK, look! Now listen!”  Then she speaks the word clearly and carefully and he repeats it as best he can.  This happens over and over, in the hope someday he can repeat it with ease and others will understand what he says.

So I ask you friends:  Are you ready?  OK, look.  Now listen!  God has a word to tell you, to teach you, so that you can hear it, understand it and repeat it to others.  Listen to and learn God’s Word, keep it fresh in your heart and in your mouth, so that you too can speak His Word clearly and carefully to others and they will also understand.

“Now what I am commanding you today is not too difficult for you or beyond your reach…  No, the word is very near you; it is in your mouth and in your heart so you may obey it.”

~ Deuteronomy 30:11, 14

Monday, March 19, 2012

Easter Decor

With Easter only weeks away, I thought I'd post some fun ideas this week for entertaining on Easter.  Today I'll show you some decorating ideas.

Last year we hosted Easter dinner and an Easter Egg Hunt at our home.  What started out as small quiet idea blew up into 45 people!  I. was. in. heaven.  I love entertaining and always dreamed of having a big enough house to do things like this.  Wish granted.  

To prepare, I started weeks ahead of time, gathering ideas and supplies. I did a daffodil inspired theme using green & yellow, lots of nice china & silver, and my old friend - moss.  The centerpieces are always where I like to start - they are the focal point of the whole meal.  So I gathered mini daffodils, silver platters, piles of gathered moss, and some specially died eggs (that I'll show you how to make later).  Here are the final results:
Easter Centerpiece - close up (notice the coffee table in the background has a similar arrangement).


I wanted the centerpieces to look like little grassy, mossy knolls with daffodils growing, and eggs nestled around them.  I used all sorts of things (paper bowls & cups, wadded up paper) to build up the mound around the pots of daffodils.  Then the morning before Easter, I went to my previously scouted spots and gathered all sorts of cool and different kinds of moss.  I carefully cut and shaped the mosses around their new landscapes - and voila!  Here's some good shots of the different mosses:


 With the extra moss, flowers and eggs, I decorated the rest of the house.  Here's a few shots of random decor here and there:


The Easter Egg cards were from some extra inventory I still had from my stationery line ages ago, back when Stardust Designs was Stardust Stationery.  Stay tuned for a tutorial on the dyed eggs, the flower baskets and more pics from that beautiful Easter Day.

Friday, March 16, 2012

Touches O' Green

I promised to show some of the touches of green that are around the house in honor of Spring and St. Patrick's Day too.  As I've admitted before, I am a true Northwest girl and I love me some moss.  This is a great option in early Spring before the flowers are out in full force.

This week, I've been showing small pieces of our front porch.  So here it is put altogether.  The Spring Wreath and the Mossy Urns only cost me about $10 total.  The rest I already had, including the old Christmas bows that I stuck in the big urn (they're a place holder until I can plant some flowers).  Its pretty simple and green - but that suits me fine for early Spring.  Plus, it didn't cost much so I can use the money I saved for flowers next month. 


Here's a better "during" picture (the colors are truer in this pic)...


Now, going inside I have a few touches o' green in the living room and dining room... 
I bought [fake] moss balls at the Dollar Store.  They come in a bag of maybe 7-10 and are usually near the vases.  Its hit-or-miss when they're in stock, so you have to keep an eye out for them!

On the dining table I have an old set of china displayed (pictured above) that my mom got for me ages ago.  Then last year while antiquing, I found some matching pieces on their dollar shelves.  What a deal!  I love bringing it out every Spring.

Here are a few more pics from around the house...


And in the kitchen...  I try to always keep the sink area pretty, since I'm staring at it so much!  The urn hides all the ugly unsightly sink stuff (sponge, scrub brush, SOS pad, drain plug, etc).  Its easy to reach and helps the sink look tidier when people are over.

So, there you have it.  A wee bit o' green before St Patty's Day. Anybody making green mashed potatoes or maybe something authentically Irish?  This year, I'm making homemade Pea Soup w/ ham.  Happy St Patrick's Day!


Thursday, March 15, 2012

Moss Filled Urns

 
Remember these two freshly spray painted urns from last week's post?  Well, I'm finally showing you how I topped them off with some moss.  Its a perfect solution for March - a bit of green for the porch - while I wait for warmer flower weather.  And it only cost me about $4.

The supplies you'll need for this project are:
  • An outdoor container - urns or pots, etc.
  • Moss (I used floral moss & Spanish moss - both at are Walmart for about $2 per bag)
  • Paper bag or brown craft paper 
  • Plastic bags
  • Hot glue gun and a few hot glue sticks
 That's it! The total cost for me (just the moss) was about $4-$6 dollars.


Step 1. Make a Mound. Start by filling your urns or pots with enough plastic bags to have a nice "mound" on top.  I used plastic bags (that we usually reuse for garbage) because they are water proof and won't get soggy or fall apart in the weather.

Step 2. Cover the Mound. Use brown craft paper (or a paper bag will do) to cover the plastic mound.  Why?  The moss will be glued down to this surface - and the plastic bags would melt.  Also its more natural looking than the bright white of the plastic bags, so it won't show through the moss as easily.  Other bonus: If you ever dampen your moss (to keep it green) the paper will help hold the moisture.

Step 3. Add Floral Moss.  I centered the floral moss and used my hot glue gun to secure it down.  In some spots, I added two layers of moss, for a more natural, lumpy, mossy look. Don't worry too much about any exposed edges.  The Spanish moss will cover it.

Step 4. Tuck in Spanish Moss. I used Spanish Moss around the edges to add a bit more interest and texture.  Plus it softens the edges around the urn.  I used a combination of tucking it in and hot gluing it. Make sure you cover all the brown paper around the edges.

And you're done!  Here's a little peak of the two completed moss filled urns before I put them on the porch.  A little note if you're doing more than one container: I put them side-by-side to make sure they both looked similar.  I didn't want one to be more "mounded", or dripping with moss than the other.

I'll have completed porch pictures for you tomorrow (hopefully the weather will be better).  I'll also show you a few other touches o' green that I've added around the house.  Just in time for St. Patrick's Day!

Friday, March 9, 2012

Lessons from A to Z ~ Modern Day Foot Washing

Laundry. 9 piles long, 3 piles deep, and more in the washer and dryer.
     A picture speaks a thousand words, so I’m starting this lesson with the picture above—please observe.  This. Is. A lot. Of laundry. At least, it’s a lot for me!  With four kids now (one who plays hard at recess, one who attracts all the mud from our long country driveway, one who has diaper blow outs, and one who drools chronically), I have entered a whole new realm of laundry.  Multiply that by a few days of not doing laundry, and you get the above picture.

     At first, folding this much laundry was like conducting a scientific experiment.  “How much dirty laundry can I find throughout the far corners of our house?”  But after the novelty wore off, fascination was replaced with my own pity party.  And as the piles grew, so did my pity party.

     “I did post-graduate work in seminary for this??  What a waste.”
     “I should be out there, ministering to the multitudes! Not in here muttering to piles of laundry.”   I pictured Jesus preaching the sermon on the mount.  “I want to be more like Jesus.”  Sigh.

     Then another picture came to mind.  Jesus—God incarnate, the Great I AM—washing the feet of his disciples.  Washing Peter’s feet who denied him, washing Judas’ feet who betrayed him.  And it was in NO WAY a waste of His time.

     In that simple, humble act, He demonstrated what it means to be a servant, and what it means to truly minister.  Humbling stuff. I am in no way “too good for this”.  I am in no way wasting my time or ministry.  But through serving my children, I will better understand how Christ served us, sacrificed for us, and modeled how leadership and ministry should be done.  My new prayer while folding, cleaning (or washing little feet!) is that I will be a better leader and minister “out there”, because I also served here.

“Now that I, your Lord and Teacher, have washed your feet, 
you also should wash one another’s feet.  
 I have set you an example that you should do as I have done for you.” 
~ John 13:13-15 ~

Thursday, March 8, 2012

Spring Cleaning the Front Porch

This whole week I'm sprucing up our front porch - getting it ready for Spring.  Today I'm touch-up painting my garden urns and outdoor furniture.  I do this every year or two when I start seeing the paint chip or discolor from being outside.  It only takes 1 can of spray paint for a touch-up.  I use Rustoleum in a black, textured, rod iron finish.

Here are my smaller two urns, painted and drying on the porch.

And here is one of our big urns I also painted.  Yes, those are old Christmas bows in the big one.  (Hey, they work as greenery until the weather warms up and I can plant something it there. And I'm re-using something for free!) I added an old metal topiary form in the middle, to give it a little structure and make it look less Christmas-y and more Spring-like.

While the urns were drying, I shook the mats, swept the porch, cleaned the porch light and cleared cobwebs away - leaving a nice clean canvas to work with.  Here are some of the urns arranged on the porch and ready to be filled with moss for my next porch project.  They will tie in nicely with the front door's mossy Spring Wreath I made yesterday.

We are getting some sun these days, which always makes Spring cleaning easier.  Has the Spring Cleaning Bug bitten you yet?

Tuesday, March 6, 2012

A Simple Spring Wreath


This week I'm working on sprucing up my front porch.  Its March, and spring is in the air (even if there still is a little snow on the ground).  But with this chill, I don't want to fill the porch with pots of flowers yet, only to see them freeze or fade.  I'm desperate for some green around here, so I'm looking to one of my old favorites - moss.


I wanted to make a simple spring wreath using moss, ribbon, some kind of wreath form, and as little money as possible.  But I had no wreath form or moss.  Then I found this wire wreath form (below) at the thrift store for 49 cents.  I love it when that happens.

I bought some floral moss at Walmart for $2 per bag, and only used 2 bags.  I already had a long length of white ribbon and a few sticks of hot glue.  So, for a under $5, I had all the supplies I needed.
The floral moss - or sheet moss - literally comes in sheets.  So it was easy to unfold and wrap around the wreath form.  I worked in small sections, running hot glue along portions of the wire, then covering in moss.  In just a few minutes, I was left with this:
I secured any loose pieces of moss with a dot of hot glue.  Then I used a long loop of white ribbon to hang it from the door, securing it with a thumb tack on the top of the door.  Here is the final product:

That's it.  I told you it was going to be simple.  But its lush and green and costs under 5 bucks! And I don't mind simple (especially after the holdays).  Plus I can always add to it as we come into Spring.

Thursday, February 23, 2012

Flour Sack Pillow


My daughters and I recently made a Flour Sack Pillow that we worked on together.  It was a wedding gift for some friends, and my daughters were their flower girls.  Here is a picture I couldn't resist putting in...
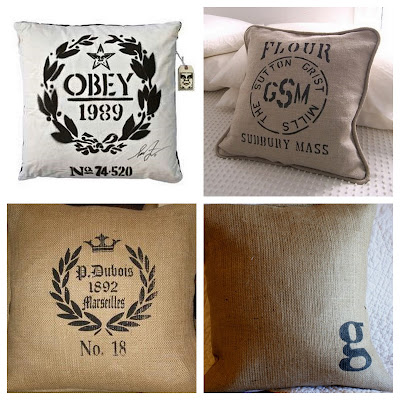
 Sweet things...OK, back to doing the pillow.  We first got online and searched for different designs we liked.  We looked at flour sack designs, burlap, monograms.  Anything that looked cool and could be personalized for the happy new couple.  Here are some of our favorite inspirations:

My youngest liked the flour sack idea, my oldest liked the monogrammed burlap pillow that we've done before here.  So we agreed to do a two-sided pillow, one side made by each girl with their own designs. Here's our supply list:
  • 1 yard of burlap
  • 1 yard of flour sack material (you can buy flour sack dish towels at Walmart)
  • Pillow insert
  • iron-on transfer paper
  • scissors, an iron, a sewing machine
Step 1. Sew pillow cover on 3-sides. I measured mine large enough for a pillow insert I had bought for the project.  SIDENOTE: I actually found a cute $10 throw pillow at Ross that had a zipper-cover.  I kept the pillow cover for myself (and put it around a throw pillow I already had but wasn't using).  And then I basically had a high-quality, down-filled pillow insert for free for this project!  And free isn't bad.
My $10 Ross pillow - keeping the cover for myself and using the insert for this project.

Using the pillow case as a template for my pattern.
Step 2. Create your design.  After we looked online and found the styles we liked.  I put together a design in Word, using the couple's wedding date, location and initials.  Once each design was approved by my daughters, I inverted the images and printed it on iron-on transfer paper.


I printed the circle border (which seemed a common design on flour sacks) as two semi-circles and fit them on one sheet.

Once we printed them out, I carefully cut out the design, leaving 1/8" border of white as I cut.  I didn't cut out each letter individually, but rather cut them in "groups" keeping each line of text connected.  I kept a small strip in between each letter - this helped me keep them lined up and spaced evenly. I just made sure to keep it as small and subtle as possible, so the shiny finish isn't noticeable.

Step 3. Iron transfer onto pillow. I placed a small towel inside the pillow case, so the transfers wouldn't bleed through to the opposing side.  Then I carefully measured and centered the design face-down on the pillow, ironed, let cool, and repeated on the other side.
Burlap side with monogrammed "D" carefully centered, ironed and cooled.
Once completely cooled, carefully peel off the transfer's paper backing.  If there are any touch-ups necessary, place the backing over the design again and iron the spots that need it.
Flour sack design - peeling the paper backing off carefully.

Step 4. Insert pillow into case and sew remaining side.  I ironed the remaining side's seam one more time to make sure I had a neat clean line to hand stitch.  

 
Once it's sewed up, you're done! And you have yourself a one-of-a-kind pillow that looks great in any home.  Here's the finished product, with my daughters showing each of their designs.

Finished Flour Sack Pillow
Finished Burlap Monogrammed Pillow
I liked doing the half flour sack / half burlap pillow because it matched their bridal shower's theme (burlap & white).  For more details on that lovely outdoor bridal shower - click here.  What a fun shower to throw and what a fun wedding gift to make with my kids!

Sunday, February 19, 2012

Lessons from A to Z ~ Resolutions


    February is not only a time to celebrate love, it is also a good time to check in on January resolutions.  By this time, they’ve  either been long-forgotten or better yet, are taking root as new habits.

     It was during Christmas that I was inspired to make one of my resolutions.  The kids had asked me what they could get me for Christmas.  My answer was probably similar to what millions of parents have said before me, “I just want you to be good kids, love one another, mind your parents and God.” Maybe I asked them to color a picture for me too.

    But it got me thinking—what can I give to my own heavenly Father?  He gave His only Son, so that I may be His child too.  What can I possibly give Him? 

     Doesn’t He want the same thing for me, as I do for my children? To love the Lord with all my heart, soul, and strength.  And to love others as myself (Luke 10:27).  What can I give Him that would help me depend on Him more to do this? 

     For me the answer came easily and humbly… my impatience.  It is a gift certainly only the Lord could appreciate and handle!  With foster parenting, going from 2 to 4 kids, and now having two in  diapers—it hasn’t always brought out the best in me!  How quickly and easily I realize I can run out of patience: with myself, with my situation, with these 4 precious children.  It has been humbling.

     Thankfully, God brought this verse to mind (and continues to bring many others!) that help me with this new resolution...

Humble yourselves, under God’s mighty hand, that he may lift you up
in due time.  Cast all your cares on Him because He cares for you.    
~ 1 Peter 5:6-7 

     So I cast my impatience on Him—as a “gift” only He would want, as my resolution for the New Year—asking for His grace, patience and strength in return. 

 What does God want from you this year?

 He said to me, “My grace is sufficient for you,
 for my strength is made perfect in weakness.
Therefore I will boast all the more gladly about my weaknesses,
so that Christ’s strength may rest on me.
~ 2 Corinthians 12:9